
Understanding the Bortle Scale: A Beginner's Guide to Dark Sky Photography

By ESO/P. Horálek, M. Wallner
Table of Contents
1. THE BORTLE SCALE EXPLAINEDComplete breakdown of sky darkness classes |
2. FINDING YOUR BORTLE RATINGTools and measurement techniques |
3. NEXT STEPSNext steps and recommendations |
4. FAQCommon questions answered |
Understanding the quality of the night sky is an important step towards mastering astrophotography. While many photographers focus on camera settings and gear, the darkness of your shooting location often determines your success more than any other factor. This is where the Bortle Scale becomes an invaluable tool in your astrophotography arsenal.
The Bortle Scale, developed by amateur astronomer John E. Bortle in 2001, has become the standard measurement for night sky darkness, offering photographers a reliable way to assess and plan their shoots.
Why Understanding the Bortle Scale Matters
As a photographer who regularly leads workshops across the American Southwest's darkest skies, I've witnessed firsthand how different levels of darkness can transform both the viewing and photography experience. The Bortle Scale isn't just another technical measurement – it's a practical tool that can revolutionize your approach to night sky photography. Whether you're planning to capture the Milky Way's intricate details or photograph distant nebulae, knowing your location's Bortle class helps you:
Determine the best locations for your shoots
Set realistic expectations for what you can capture
Choose the right equipment for your conditions
Plan your post-processing strategy effectively
Maximize your time in the field
For beginners, the Bortle Scale serves as a crucial guide in understanding why certain locations yield better results than others. For more advanced photographers, it becomes a strategic tool for planning more advanced shots and deciding when specialized equipment might be necessary.
In this guide, we'll explore everything from understanding the Bortle Scale to applying this knowledge in real-world shooting situations. Whether you're shooting from your backyard or planning a trip to one of America's dark sky locations, this guide will help you make informed decisions about your astrophotography.

Looking to deepen your astrophotography knowledge? Download our free Astrophotography Foundations ebook for essential techniques and tips that complement this guide.
The Bortle Scale Explained: A Complete Breakdown
Understanding each class of the Bortle Scale helps photographers make informed decisions about their shooting locations and techniques. Let's explore each level and what it means for your photography, using the Milky Way as our reference.
Class 1 & 2: Photographer's Paradise

Class 1: Excellent Dark-Sky Site
Visibility: The Milky Way casts visible shadows; zodiacal light is striking
Photography Potential: Prime for deep-sky imaging without filters
Notable Features:
Airglow is readily visible
M33 (Triangulum Galaxy) is easily visible with naked eye
Best For: Deep sky astrophotography, Milky Way panoramas
Location Examples: Natural Bridges National Monument, Utah
Class 2: Typical Truly Dark Site
Visibility: Summer Milky Way is highly structured
Photography Potential: Excellent for most astrophotography
Notable Features:
Zodiacal light visible in spring/fall
Faint star clusters easily visible
Best For: Wide-field Milky Way shots, star trails
Pro Tip: Many of our Utah Badlands workshops take place in Class 2 locations, offering pristine dark sky conditions.
Class 3 & 4: The Sweet Spot

Class 3: Rural Sky
Visibility: Some light pollution visible at horizon
Photography Potential: Very good for most targets
Notable Features:
Milky Way still shows good detail
Some airglow visible on good nights
Best For: Most astrophotography projects
Equipment Note: Light pollution filters optional but helpful
Class 4: Rural/Suburban Transition
Visibility: Light pollution visible in several directions
Photography Potential: Good with proper technique
Notable Features:
Milky Way visible above 35° from horizon
Some loss of fine detail
Best For: Bright deep sky objects, lunar, planetary
Check out our partner LensRentals.com for light pollution filters (use code TENSIX15 for 15% off!)
Class 5 & 6: Urban Outskirts

Class 5: Suburban Sky
Visibility: Milky Way weakly visible near zenith
Photography Potential: Challenging but rewarding
Required Techniques:
Image stacking becomes essential
Light pollution filters recommended
Best For: Lunar, planetary, bright star clusters
Resource: Check our monthly astrophotography events guides for optimal shooting times in these conditions
Class 6: Bright Suburban Sky
Visibility: No Milky Way visible to naked eye
Photography Potential: Limited but possible
Required Techniques:
Multiple short exposures
Heavy emphasis on post-processing
Best For: Moon, planets, brightest deep sky objects
Equipment Recommendations:
Quality tracking mount
Specialized filters
Class 7-9: Urban Challenge

Class 7-9: Suburban/Urban/Inner City
Visibility: Only brightest stars visible
Photography Potential: Specialized and targeted
Techniques Required:
Narrowband imaging
Advanced stacking methods
Best For:
Bright planet imaging
Solar (with proper filters)
Learning Opportunity: Our Astro Masterclass includes techniques for shooting in light-polluted conditions
Tip: Read our post on Light Pollution. It is an essential guide for any urban photographer looking to capture the night sky.
Understanding Your Local Rating
Remember that Bortle ratings can vary seasonally and with atmospheric conditions. A location might shift between classes depending on:
Weather conditions
Seasonal changes
Local development
Time of night
Atmospheric clarity
This breakdown shows why location scouting is crucial for astrophotography success. While Class 1-3 locations offer the best conditions, understanding how to work within your local Bortle class can still yield impressive results with the right techniques and equipment.
Finding Your Bortle Rating: Tools and Techniques
You might have wondered how exactly do you determine your local Bortle class? Let's explore the various methods and tools available, ranging from simple visual assessment to advanced digital solutions.
Visual Assessment Method
The most basic way to check your Bortle level involves careful observation of the night sky. While not as precise as digital tools, visual assessment can provide a quick estimate of your location's darkness. Here's what to look for on a clear, moonless night:
First, allow your eyes to adapt to the darkness for at least 30 minutes. During this time, avoid looking at any bright lights or screens. Once your eyes have adjusted, look for these key indicators:
The Milky Way Test
The appearance of our galaxy provides excellent clues about your Bortle class:
Clearly visible with structure: Likely Bortle 1-3
Visible but lacking detail: Probably Bortle 4-5
Faintly visible or invisible: Bortle 6 or higher

Star Counting Method
Choose a familiar constellation and count the visible stars within it. For example, in Orion:
20+ stars visible: Likely Bortle 1-3
10-20 stars: Probably Bortle 4-5
Fewer than 10 stars: Bortle 6 or higher
Right: Orion and The Seven Sisters.
Digital Tools and Apps
Modern technology offers more precise methods for determining your Bortle class. Here are the most reliable tools:
Light Pollution Maps
Several online resources provide detailed light pollution maps that correlate with Bortle ratings:
Clear Outside (includes Bortle predictions)
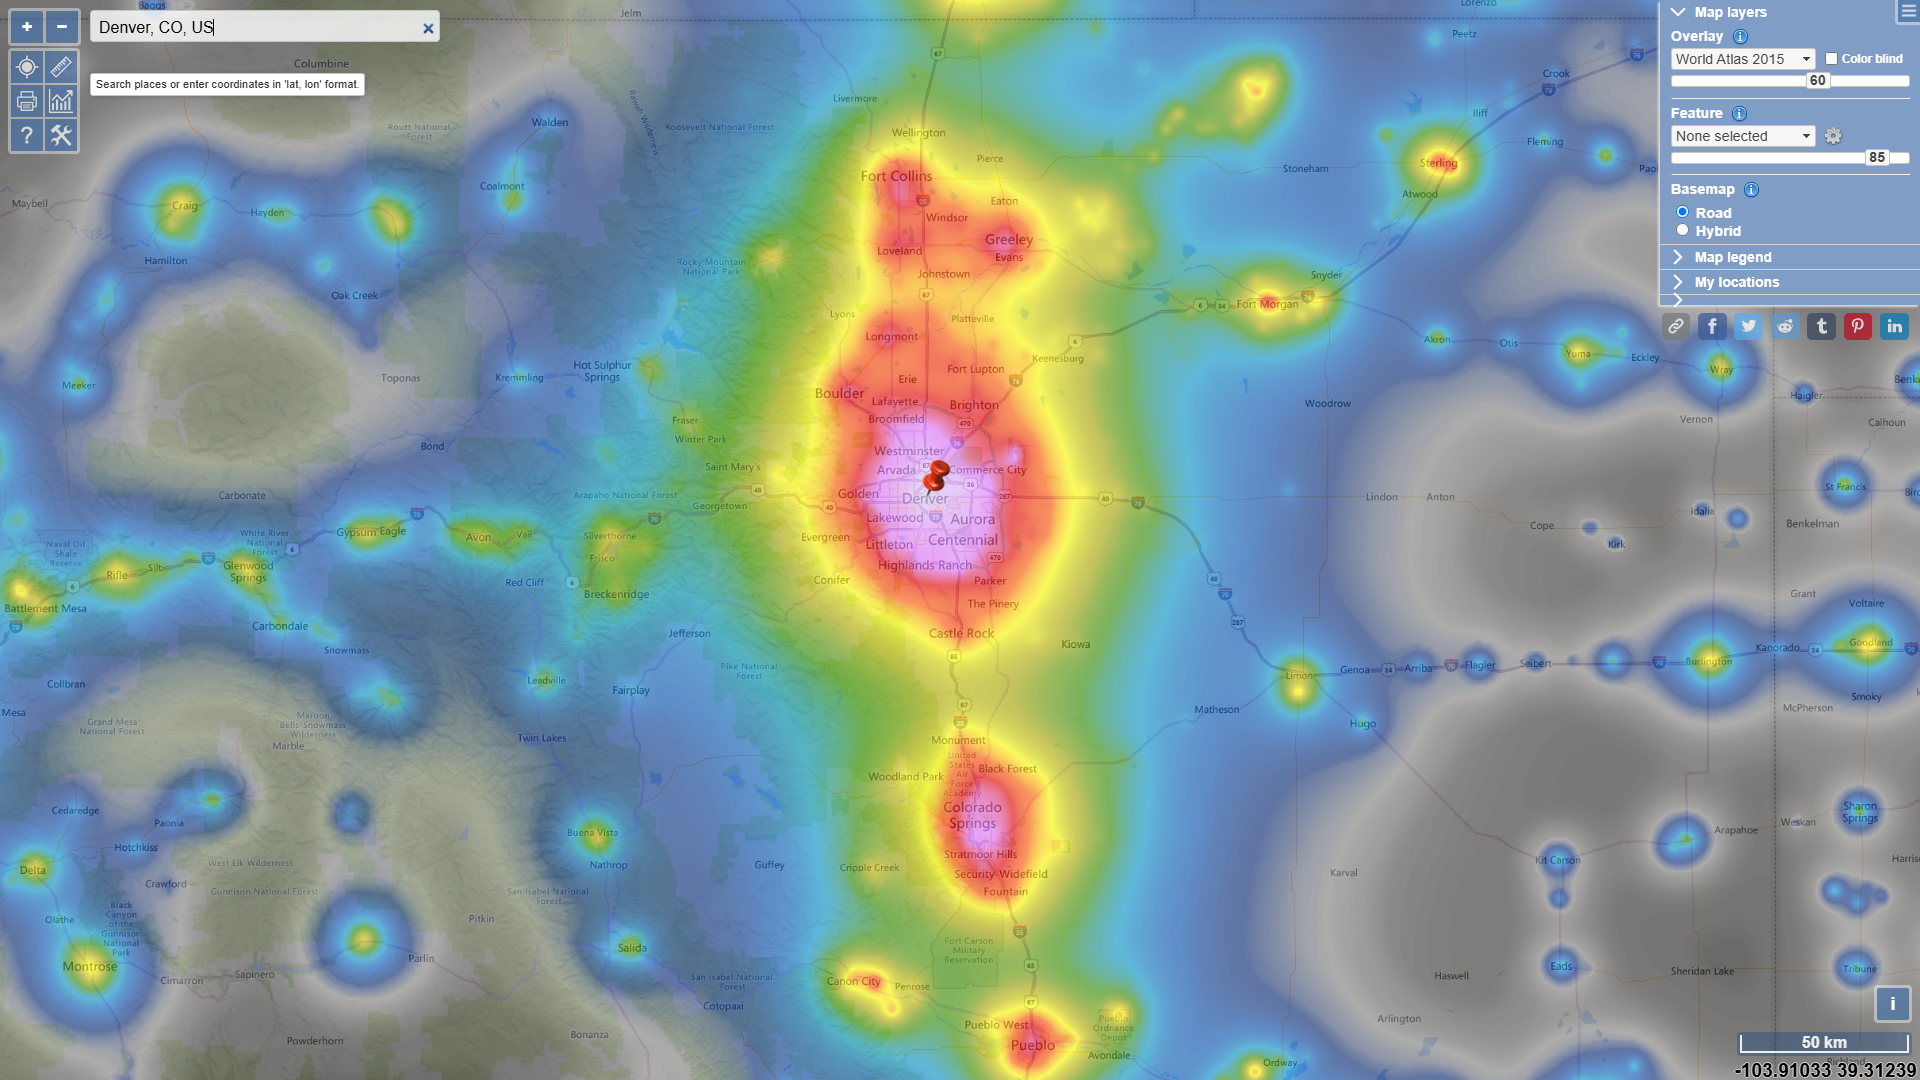
Lightpollutionmap.info is a free tool for locating dark locations on the world map.
Mobile Applications
Several apps can help you assess sky darkness:
Sky Quality Meter apps
Star counting applications
Astronomy weather apps with darkness ratings
Professional Measurement
For the most accurate readings, consider using specialized equipment:
Sky Quality Meters (SQM)
Digital cameras with manual settings
Specialized darkness measurement devices

Devices such the Unihedron SQM-L Sky Quality Meter allow users to measure their sky brightness in magnitudes per square arcsecond.
Pro Tip: During our Astro Masterclass workshops, we demonstrate how to use these tools effectively and interpret their readings for better shooting decisions.
Understanding Your Readings
Remember that Bortle ratings can vary based on several factors:
Temporal Factors
Time of night (darkness typically peaks around 2 AM)
Season (winter often offers darker skies)
Moon phase and position
Weather conditions
Environmental Factors
Altitude (higher elevations often have darker skies)
Humidity levels
Air pollution
Local development changes
Planning Around Your Bortle Rating
Once you've determined your local Bortle class, you can better plan your shoots:
Local Shooting
If you're limited to shooting in your area, consider:
Timing your shoots during optimal conditions
Using appropriate filters and equipment
Focusing on subjects suitable for your darkness level

For more specialized deep-sky imaging, broadband and narrowband filters are incredibly effective. These filters isolate specific wavelengths emitted by nebulae, allowing you to capture details that would otherwise be lost in light-polluted skies.
Common narrowband filters include:
Ha (Hydrogen-alpha): Ideal for capturing the red hues in emission nebulae
OIII (Oxygen III): Great for blue-green nebulae details
SII (Sulfur II): Captures red wavelengths different from Ha
Read more in our guide on Conquering Light Pollution.
Dark Sky Excursions
For those seeking darker skies:
Research dark sky locations within driving distance
Plan trips around new moon periods
Join organized workshops in dark sky areas
Recording Your Findings
Keep a log of your location assessments including:
Date and time of measurement
Weather conditions
Equipment used
Results obtained
This data helps you identify patterns and optimal shooting conditions for your area. Many photographers find that certain locations vary by as much as two Bortle classes depending on conditions.
Your Next Steps
Understanding the Bortle Scale transforms how we approach astrophotography, providing a reliable framework for planning and executing our night sky shoots. Whether you're shooting under pristine Class 1 skies or working with the challenges of urban light pollution, this knowledge helps you make informed decisions about equipment, techniques, and locations.
Key Takeaways
The Bortle Scale serves as a crucial planning tool for astrophotography
Different Bortle classes require specific techniques and equipment
Local conditions can vary significantly based on time and environmental factors
Even in higher Bortle classes, compelling astrophotography is possible with the right approach
Moving Forward
To continue developing your astrophotography skills:
Download our Astrophotography Foundations ebook for in-depth techniques
Consider joining an Astro Masterclass to learn advanced techniques
Attend our workshops to experience astrophotography lessons first-hand
Remember, every great astrophoto begins with understanding your conditions. The Bortle Scale isn't just a measurement - it's your roadmap to better night sky photography.
Clear skies, and happy shooting!
FAQ
Q: How do atmospheric conditions affect Bortle Scale readings?
A: Atmospheric conditions can shift apparent Bortle ratings by 1-2 classes. Humidity above 70% can scatter light and increase sky brightness. High-altitude locations (above 7,000 feet) typically read 0.5-1 classes darker due to less atmospheric interference. Temperature inversions in valleys can trap light pollution and artificially increase the Bortle rating.
Q: What's the mathematical relationship between Bortle classes and limiting magnitude?
A: Each Bortle class corresponds to specific limiting magnitude values:
- Class 1: 7.6-8.0
- Class 3: 6.6-7.0
- Class 5: 5.6-6.0
- Class 7: 4.6-5.0 These values indicate the faintest stars visible to the naked eye, decreasing by approximately 0.5 magnitude per Bortle class.
Q: How does sensor technology interact with different Bortle classes?
A: Modern sensor technology becomes increasingly important in higher Bortle classes. Full-frame sensors with pixel sizes >5.5μm typically perform 0.5-1 Bortle classes better than APS-C sensors in light-polluted conditions due to improved signal-to-noise ratio. Sensors with dual gain architecture can effectively shoot in conditions up to 2 Bortle classes higher than traditional sensors.
Q: Can Bortle Scale measurements be affected by airglow, and how do you compensate?
A: Natural airglow can add up to 0.5 to the apparent Bortle class reading. This effect is strongest near solar maximum and during geomagnetic activity. To compensate, take readings on multiple nights and average the results. Airglow typically peaks 2-3 hours after sunset and can be distinguished from light pollution by its characteristic green tint in photographs.
Q: What's the correlation between exposure time and Bortle class for Milky Way photography?
A: Required exposure time approximately doubles with each Bortle class increase to maintain similar detail:
- Class 2: 15s at ISO 3200, f/2.8
- Class 3: 30s at ISO 3200, f/2.8
- Class 4: 60s at ISO 3200, f/2.8 or 30s at ISO 6400
- Class 5: 120s tracked or multiple stacked exposures required
For detailed exposure guides across all conditions, refer to our Astrophotography Foundations ebook.